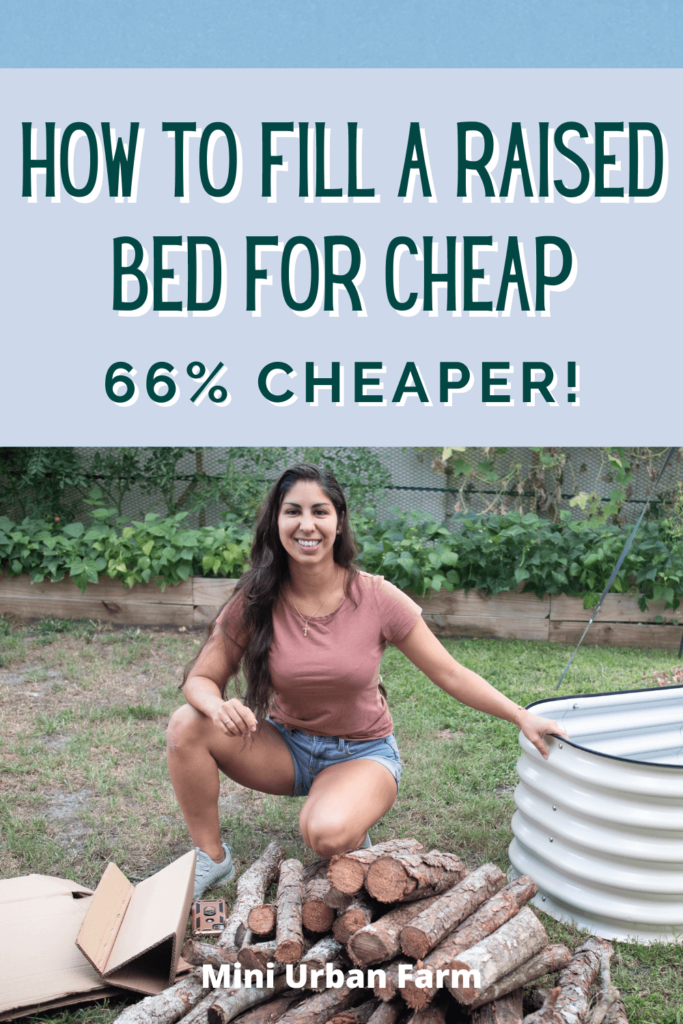
Filling your raised garden beds with soil can get expensive, fast! But what if you could find a way to use things you have laying around to reduce the cost of filling your beds? Using things like empty cardboard boxes and dead tree branches can cut costs a ton – which means more money for plants! That’s why I’ve put together this step by step guide on how to fill a raised bed for cheap.
How to fill a raised bed for cheap:
- Materials needed
- Steps for filling your beds
- How much does it cost to fill raised beds?
- What to do next
- How to set up an irrigation system for raised beds
- When can I plant in my new raised bed?
- Do you need to remove the grass under a raised bed?
- Should I put rocks in the bottom of my raised garden bed?
Disclosure: This post may contain affiliate links. If you purchase a product through one of our affiliate links we make a small commission from the sale at no extra cost to our readers.
How to fill raised beds for cheap
Going to the garden center to get soil for your raised beds is super convenient.
But it will also cost you a lot.
So instead, I decided to save that money for new plants and put in a little bit more effort when it came to filling my raised beds.
This method uses a mixture of cardboard, twigs, tree branches, and garden soil to cut the cost down to almost a third of the price – hard to beat that at the garden center!
Plus, finding materials for your raised beds is super easy.
I gathered materials from the property we’re building on, but you can find organic materials for free around your community. Think neighbors, parks, and lawn companies!
And for more gardening resources, get access to our free gardening resource library! It will help you fast track your garden and it only takes 5 seconds!
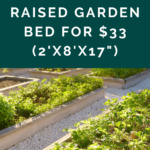
Materials Needed
First, you’ll need to gather your materials using the supply list below.
But before you can do that you’ll need to determine how much of everything you’ll need.
Each of my raised beds is 2 feet wide by 8 feet long by 17 inches tall. The list below is enough to fill up that size bed.
Use those measurements to gauge how much of everything you’ll need. And remember, it’s not an exact science so if you’re a little bit off that’s completely fine!
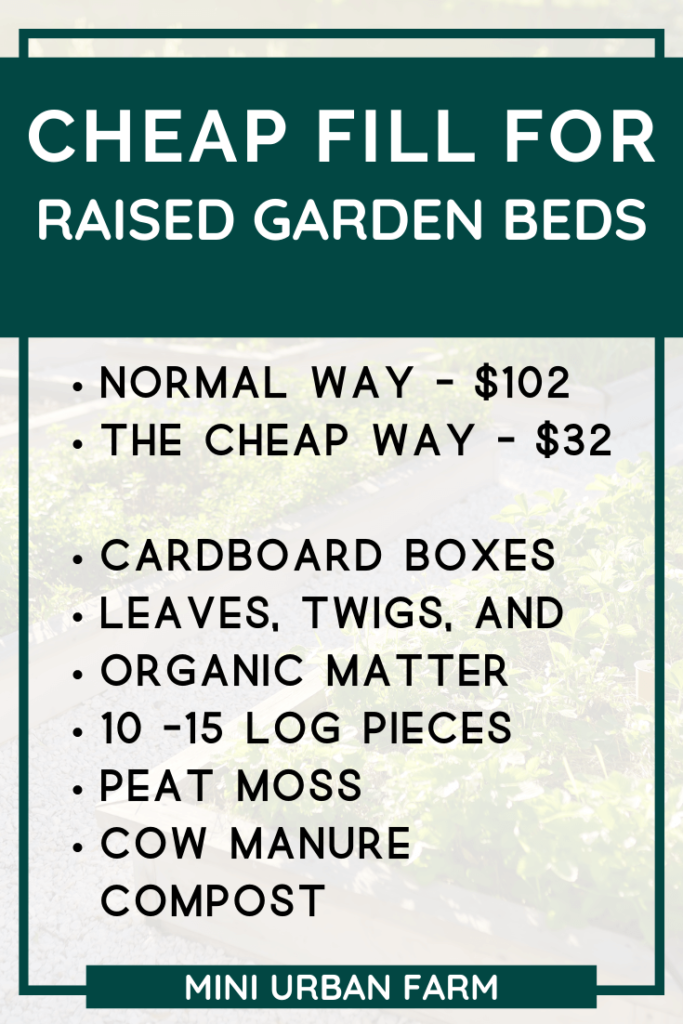
- 3 large cardboard boxes
- 3 trash bags full of leaves, twigs, and other organic matter
- 10 -15 log pieces
- 2 bags of peat moss (3 cubic feet each)
- 4 bags of cow manure compost (50 pounds each)
Also remember that when gathering your supplies, it’s important to find things that have not been sprayed with pesticides or other chemicals.
The last thing you want is that stuff leaching into your soil!
And for the cardboard boxes, the bigger the better.
I try to find the biggest pieces I can find because it will really help in covering the ground and preventing weeds from popping up in the long run.
Any type is fine – you can use amazon boxes, boxes from the store, and even wine club boxes (a great way to convince the hubby you need more wine!)
Just make sure that they aren’t covered in tape or any glossy materials – you want just the cardboard!
Steps for Filling Your Raised Beds
Now that it’s time to actually fill your beds, there is a specific order you’ll need to follow.
Essentially we’re setting up a hügelkultur style raised bed. Which means the organic materials will start decomposing inside our beds over time, providing nutrients back into the soil.
1. Cardboard layer
Start by adding your flat cardboard boxes to the bare ground inside your beds.
You’ll definitely want some overlap here so that those annoying weeds don’t start poking through!
And if you have enough material for a double layer I would highly recommend it!
Remember, the more cardboard now, the less weeding you’ll do later!
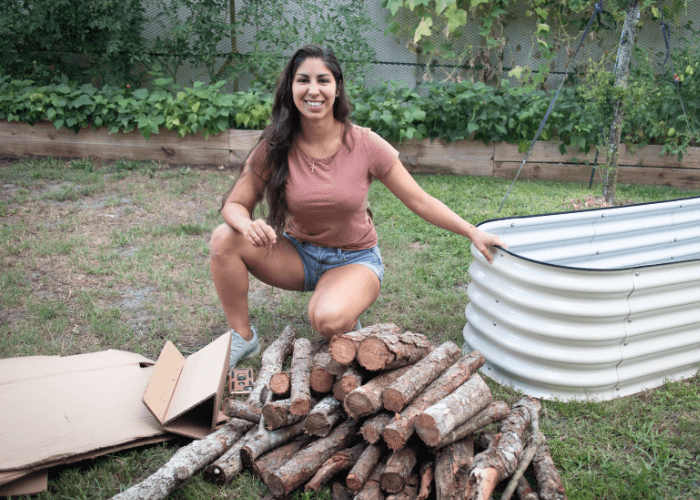
2. Logs
Next it’s time to add in your logs.
Use the biggest and thickest logs you can find and layer them as close as you can for this layer.
This will be the layer that generates heat during decomposition and gives us all those long term nutrients!
Don’t worry if you have gaps between them, though. We’ll fill those up in this next step!
3. Organic Matter
Time to dump in all that organic matter.
Remember those three trashbags full of twigs, leaves, etc?
All this will be used to fill in the gaps between those logs and add in some quick-composting materials to your beds.
This should bring everything up to about a third of the height of your bed – just enough space to add in your next layer!
4. Garden Soil
Next, open up your bags of peat moss and carefully scoop it into your raised bed.
Since the peat moss is compacted inside the bag, it will expand as you take it out – which can create quite a mess if you’re not careful!
Add both bags of peat moss evenly and make sure you fluff it up as you go – this will make it easier once you add your compost!
Then take your bags of compost and add them right on top of that peat moss layer.
First you’ll want to unclump it since it does get stuck together – and then once it’s all unclumped, you can start mixing it into the peat moss.
This is where a good hand trowel is useful! Or if it’s easier, using your hands also does the trick!
Just be careful not to poke yourself with all those twigs underneath.
And finally you’ll want to level it all out so that all the material in the raised bed is even on all sides.
Water it in and voila! A fully filled raised bed!
Psst…want to fast track your garden? Get access to my FREE gardening resource library and start maximizing your garden today!
How Much Does It Cost to Fill a Raised Bed?
Amazingly, I was able to fill up my raised beds for just 32 dollars!
That’s only 33% of what it would have cost me to buy all the soil at the garden center.
Not too bad, hugh?
So let’s break it down.
My raised bed is 2 feet by 8 feet by 17 inches – thats about 23 cubic feet of space to fill.
And the cheapest organic garden soil I could find at my garden center was 2 cubic feet for $8.97 – meaning I would have needed about 11.5 bags of soil in order to fill that bed.
So now for some basic math – $8.97 per bag x 12 bags = $107.64 total for gardening soil.
So now for my actual materials cost:
- 3 large cardboard boxes – FREE
- 3 trash bags full of leaves, twigs, and other organic matter – FREE
- 10 -15 log pieces – FREE
- 2 bags of peat moss – $11.97 each = $23.94
- 4 bags of cow manure compost – $1.97 each = $7.88
$23.94 + $7.88 = $31.82 total for one raised bed
Now, I’m not an expert in math or anything, but $31.82 is way better than over a hundred dollars on dirt you guys!
That’s tons of money for more plants, which means I’ll basically never go back to buying garden soil from the store!
What to do next
Now that your raised bed is filled, you probably want to get planting!
But hold up a minute! There’s one very important step you need to do before you plant anything in your new garden bed.
And that’s to water!
You’ll want to get your garden hose and soak the soil all the way through. This will help move the soil around a bit and remove air pockets that may have built up when you added in your materials.
After watering, the soil will settle in and start creating networks of microorganisms that will benefit your garden in the long run!
And, now is a great time to set up an irrigation system if you’re planning on using one.
Don’t get me wrong, watering by hand is totally fine, but it gets old fast – especially when summer comes around!
Plus, the easiest time to set up drip irrigation for your garden is when all the beds are empty!
How to Set Up A Drip Irrigation System for Raised Beds
Now, drip irrigation is a whole ‘nother topic in and of itself!
But if you’re even considering switching over from manual watering, now’s the time!
Your beds are empty, the soil needs lots of water, and you don’t have to worry about anything in your way.
Here are some of the benefits of drip irrigation:
- No need to go into the garden to water every time
- Can set drip irrigation on a timer (like this one) so that you never forget
- No walking back and forth with a watering can or hose
- Going on vacation is easier since your garden is watered on demand
- Easy to adjust as needed depending on the season
As you can see, drip irrigation is a life saver – especially if you hate getting up early to water your garden like I do!
Here are the basic steps (and you can watch this video for the whole tutorial.)
- Determine your drip irrigation layout using your existing garden space
- Decide on the types of emitters to use
- Gather your materials
- Do a preliminary layout
- Connect everything
- Test your lines for leaks
- Connect your system to a timer and program your days and times
As you can see, there are a few steps that can get tricky. But I promise, once you get the hang of it, it’s a breeze!
The first time I set up a drip system (in my old garden) I did everything wrong. But of course, I learn from my mistakes (and you can too) so hop on over and check out the right way to set up your drip system!
When can I plant in my new raised bed?
Technically you can plant in your raised bed right away.
But I would encourage you to wait at least a few days after you get your beds filled. This will allow the soil to settle and your plants will be happier overall.
Because the last thing you want is to plant your seedlings and they get shifted around when the soil starts settling in (trust me!)
In the meantime, here’s a few things you can focus on:
- Setting up your irrigation system
- Deciding on what to grow
- Creating your garden layout for the season
- Ordering seeds online
- Starting seedlings
- Testing your seed germination rates
- Organizing your seed collection
I know it’s hard, but letting your garden rest is an important part of having a successful garden!
Do you need to remove the grass under a raised garden bed?
No! You do not need to remove the grass under a raised garden bed.
If you add cardboard to the bottom of your raised bed and fill the bed with 8-12 inches of soil, the grass will be smothered and there won’t be any light available to the grass to keep growing.
That being said, if you have very high grass where you want to start your garden, mowing it down first is a good idea.
And if you have very persistent weeds in that space, think about removing them before starting your beds.
The last thing you want is to be pulling weeds every time you’re in the garden!
For a complete guide on when to remove the grass under a raised bed, check out this post.
Should I put rocks in the bottom of my raised garden bed?
You do not need to put rocks on the bottom of your raised bed.
The main reason why people add rocks to the bottom of plants is to increase the drainage and ensure the plant stays healthier.
However, this is almost always counterintuitive – there’s rarely a good reason to add rocks under a plant!
You see, if your raised bed is exposed to the ground (there’s no bottom to the bed, only cardboard) then the cardboard will break down over time and the roots will grow directly into the soil.
The soil itself usually provides enough drainage for plants. And plant roots are great at breaking up dense soil – so usually no need to worry about that!
And if your raised beds do have a bottom on them (which most don’t) then you’ll want to make sure you have some drainage holes to let the water out.
But putting rocks at the bottom of a raised bed as the only drainage (aka instead of drainage holes) is a recipe for disaster!
Not only will it not drain the water, but that standing water will actually cause root rot.
Crazy right? And if you want to know more, check out this post on exactly why it’s a bad idea to add rocks to a raised bed!
I hope this was super helpful! And for more gardening resources, get access to our free gardening resource library! It will help you fast track your garden and it only takes 5 seconds!
PIN How to fill a raised bed for cheap!